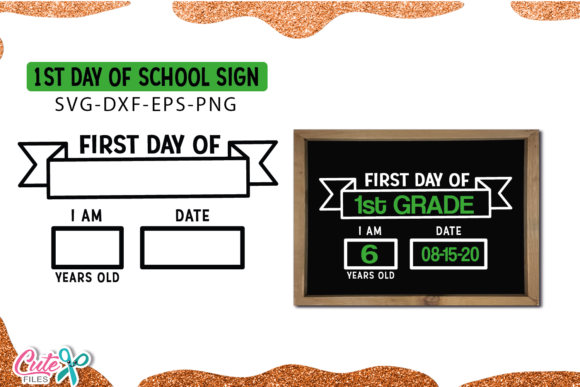
First Day of School Sign Template: What Nobody Tells You Before You Download
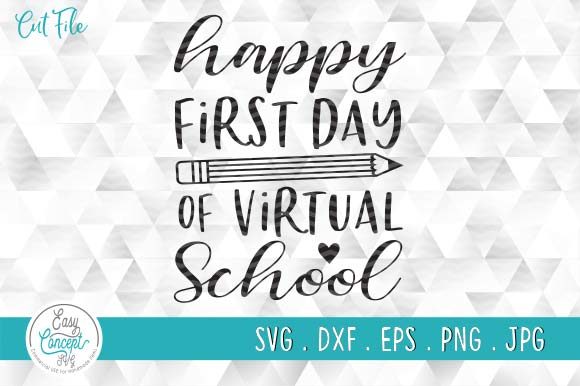
Every August, social media fills with proud parents holding handmade signs that mark the start of a new school year. The chalkboard backgrounds, the custom names, the grade numbers—it all looks effortless. But anyone who has tried to create that perfect back-to-school photo knows the gap between inspiration and reality can be frustratingly wide. That is exactly where a First Day of School Sign Template becomes more than a nice-to-have. It becomes the difference between a photo you frame and one you delete.
The First Day of School Sign Template SVG cut file format adds another layer of possibility, especially if you own a cutting machine like a Cricut or Silhouette. You are not just printing a sign. You are cutting, layering, and assembling something that looks professionally made. That potential is exciting, but it also introduces a set of decisions that can trip up even experienced crafters.
Let me walk through the common missteps, the details that get overlooked, and exactly what you should check before you commit to a template. This is the kind of advice I wish someone had given me before I wasted an evening wrestling with layers that refused to line up.
Mistake Number One: Choosing the Wrong File Format for Your Workflow
The product listing you are looking at includes an SVG, DXF, EPS, and PNG inside a single ZIP folder. That sounds thorough, and it is. But here is what many people miss: just because a file exists in your download folder does not mean it is the right one for your specific machine or software.
If you own a Cricut, you almost certainly want the SVG format. That is the native vector format that Design Space handles best. The DXF file is a solid alternative if your software struggles with SVG, but it sometimes requires extra cleanup. EPS files are excellent for professionals working in Adobe Illustrator or CorelDRAW, but they are useless if you are trying to upload directly to a consumer cutting machine app. PNG is your raster fallback—great for printing, not for cutting.
The mistake is downloading the ZIP, opening the folder, and dragging whatever file lands first into your software. That approach works maybe sixty percent of the time. The other forty percent, you end up with missing layers, distorted text, or a machine that refuses to recognize the file at all.
Better approach: Before you unzip, decide exactly which machine and software you will use. Match the file format to that specific tool. If you are unsure, start with the SVG. It has the broadest compatibility across modern cutting machines and design programs. Keep the other formats as backups, not as your primary choice.
Mistake Number Two: Assuming the Size Is Fixed
One of the most reassuring phrases in the product description is this: "This is a vector so the size can be changed." That statement is true, but it hides a nuance that causes real headaches. You can scale a vector without losing quality. That is the entire advantage of vector files. However, scaling changes proportions, line thickness, and the physical relationship between elements in ways that are not always obvious on screen.
The example photos show an 8.5″ x 11″ chalkboard. That is a standard size, but your cutting machine may have a maximum cut width of twelve inches, or you might want a smaller sign for a prop that a child can hold comfortably. When you scale down, thin lines in the SVG can become too delicate for the blade to cut cleanly. When you scale up, small decorative elements can look chunky and awkward.
I have seen people scale a template to fit a 24″ x 36″ poster board and then wonder why the fine script text turned into unreadable blobs. The software let them do it. The math worked. But the design was never intended for that scale.
Better approach: Stick within a reasonable range of the original dimensions. If the template is designed for 8.5″ x 11″, try 10″ x 13″ or 7″ x 9″ as your upper and lower limits. Preview your scaled design in outline mode before cutting. If you see overlapping paths or text that looks too thin, adjust the stroke width or choose a different element to remove.
Mistake Number Three: Overlooking the ZIP Folder Structure
The product description mentions that the ZIP folder contains folders with the previous formats to make it easier to use the format you need. That sounds like a small organizational detail. In practice, it saves you from digging through a flat list of twenty files with confusing names like sign_final_v3.ai or school_sign_cut_Layer1.svg.
The mistake people make is ignoring that structure entirely. They extract everything into one desktop folder and then spend ten minutes hunting for the right file. That might not sound like a big deal, but when you are trying to finish a project before bedtime, those ten minutes feel like an eternity. Worse, you might accidentally open the PNG when you meant to open the SVG, and then wonder why your machine is trying to cut around a raster image instead of following vector paths.
Better approach: Extract the ZIP into a dedicated project folder. Keep the subfolder structure intact. Name your project folder something like "First Day Sign – Grade 2 – 2024" so you can find it again next year. Open only the file format you intend to use, and leave the rest untouched until you need them.
Mistake Number Four: Forgetting That Personalization Requires Planning
A template is not a finished product. It is a starting point. You still need to add your child's name, the grade, the year, and possibly the school name. That sounds straightforward, but the way you personalize the template affects the entire layout.
The most common error is typing a long name into a space designed for a short one. The template's text box might look spacious on your screen, but once you type "Alexander" or "Christopher," the letters overlap, the spacing looks forced, or the font automatically shrinks to a size that is hard to read from arm's length. Another frequent issue is choosing a font that does not match the aesthetic of the template. The template comes with a specific chalkboard look. If you swap in a sleek sans-serif font, the whole sign loses its cohesive style.
Better approach: Before you type anything, measure the available text area in the SVG. Compare that to the length of the name or phrase you want to include. If the name is long, consider using a shorter form like "Alex" instead of "Alexander," or adjust the font size manually rather than relying on auto-fit. Match your font choice to the chalkboard theme—something slightly rough or handwritten works far better than a corporate typeface.
Mistake Number Five: Ignoring the Cutting Machine's Limitations
SVG cut files are incredibly satisfying when they work, but they demand precision. Your cutting machine has a physical blade, a certain amount of pressure, and a specific mat size. It cannot cut infinitely small details or handle materials that are too thick or too thin.
A template that looks gorgeous on screen may have tiny stars, thin banner lines, or intricate flourishes that your machine will tear rather than cut. This is especially true if you are using a budget-friendly vinyl rather than a high-quality brand. I have watched someone try to cut a delicate SVG on cheap craft vinyl and end up with a mat covered in shreds and frustration.
Better approach: Before you cut the final version, do a test cut on a small piece of the same material. Reduce the complexity of the design if necessary. Some templates offer simplified versions of the same layout. If yours does not, delete or simplify the smallest details in your design software. A sign with nine clean shapes looks better than a sign with twenty torn ones.
Mistake Number Six: Not Thinking About the Photo Environment
The entire point of a First Day of School Sign Template is to be photographed. Yet people often pick a template based on how it looks on a flat table, not on how it will appear when held by a six-year-old in morning sunlight.
Chalkboard signs are dark. That is part of their charm. But if you photograph a dark sign against a dark background, or in a room with dim lighting, the text becomes unreadable. The white chalk lettering that looked perfect on your computer screen vanishes into the shadows.
Better approach: Choose a template with good contrast. If the sign is dark, plan to photograph it in bright, indirect light or against a light-colored wall. Hold the sign at an angle that catches the light rather than flat-on. If you are using a chalkboard-style template, consider backing it with a white or light-colored mat to create separation between the sign and the background.
What to Check Before You Buy
Not all templates are created equal. Before you purchase a First Day of School Sign Template SVG cut file, look for these specifics:
- Layer organization. A well-made SVG will have clearly named layers for text, borders, and decorative elements. Disorganized files are a nightmare to edit.
- Font embedding. Some templates use system fonts that you already have. Others use specialty fonts that you need to install separately. Check which one applies so you are not hunting for a font at the last minute.
- Compatibility notes. The seller should state which software and machines the file has been tested with. If that information is missing, ask before you buy.
- Commercial use terms. If you plan to offer finished signs for sale, verify that the license allows commercial use. Many personal-use-only templates will get you into trouble if you try to sell the output.
Making the Most of Your Template
The First Day of School Sign Template is a tool, not a magic solution. The difference between a good photo and a frustrating evening often comes down to preparation. Check your file format before you open your design software. Test your scaling and your materials before you commit to the final cut. Personalize thoughtfully, and always keep the final photo environment in mind.
When you get it right, that sign becomes more than a prop. It becomes a ritual. You pull it out every year, update the grade and the year, and watch your child grow against the same familiar design. That consistency is something no filter or app can replicate. It takes a little planning, but the result is worth every minute.
Take your time with the setup. The photo will last a lot longer than the frustration of a rushed project.